Calico Jacket and Petticoat
Although the women’s garments that have survived in greatest abundance from the 18th century are dresses, in actual everyday life jacket + petticoat combinations were at least as common. This was especially true for people of the lower orders of society who vastly outnumbered their ‘betters’. Jacket + petticoat ensembles provided at least as much versatility as dress + petticoat ensembles did, and jackets cost significantly less than dresses – one could have several jackets for the cost of a single dress. While a woman from the middling orders of society, whose representative wardrobe this project reproduces, could easily afford dresses, jacket + petticoat ensembles would have been a popular form of ‘casual wear’, and have enabled more possibilities to mix & match.

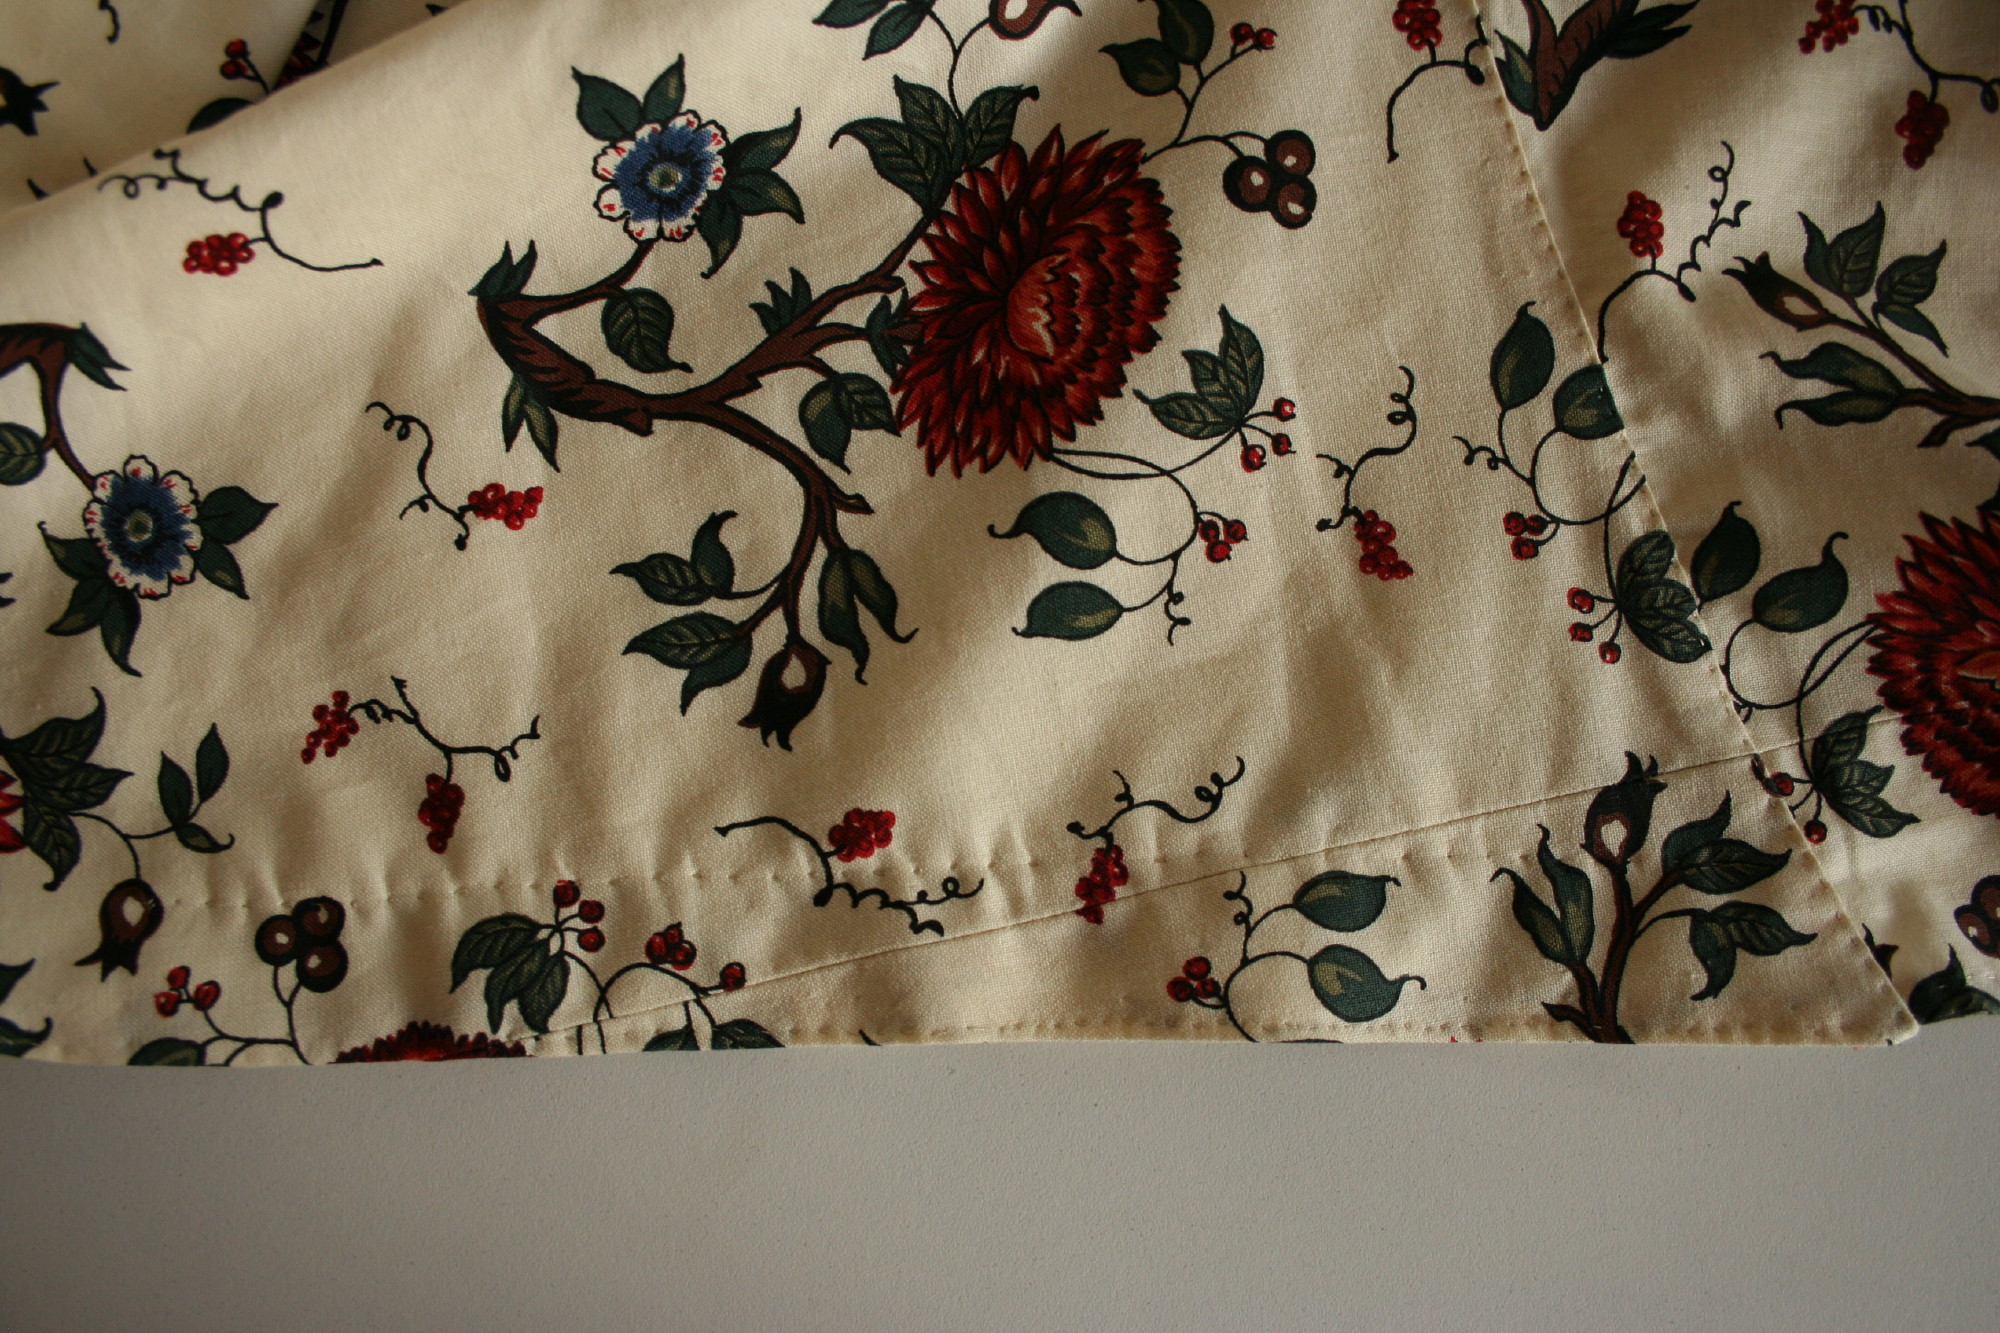
This ensemble is the least direct reproduction of the project, as it is a composite of several garments. I sythesized a couple of jackets featured in Patterns of Fashion and used construction methods from both of these along with a 1730s jacket in the collection of the Museum of London. I was somewhat inspired to use a printed cotton by a caraco jacket & petticoat ensemble at the V&A , but knew beforehand that at least one of the ensembles/garments I produced for this project needed to be made of cotton. Cotton was rapidly increasing in popularity in England at this time, despite the ban on its importation that was not lifted until c. 1771. It was both inexpensive and fashionable, and was therefore popular amongst women up and down the social ladder.

Caraco Jacket ensemble c. 1770-1780, Victoria & Albert Museum
Materials:
– Reproduction 18th century printed cotton

– bleached plainweave linen for lining
– off-white silk thread
-white linen thread
– off-white wool tape
– linen tape
– silk ribbon
Day 1
Ok, this first day was not exciting picture-wise, but this is what I did.
I drafted the pattern for the jacket using, primarily, pattern featured in Patterns of Fashion for a jacket c.1720-40 that had been altered c1770-80. Because of this alteration, the sleeves were too long for a mid-century look. I used the sleeves from another jacket featured in the book (on the same pages too, pp 26 &27) dating from c. 1760-70 which had elbow-length sleeves and pleated cuffs.
I then cut out the jacket pieces from the printed cotton, followed by cutting the pieces out again from the linen for lining.
That was it for this day – it was only a half day as I’d started out working on the sack dress. The fun really starts tomorrow!
Day 2
I started off by sewing the seams in the bodice lining – centre back, side seams, shoulders. I sewed the centre back seam with small running stitches, butted and whip-stitched the side seams, and lapped and slanted/slip stitched the shoulder seams. All of the seams were sewn using the while linen thread. Why all these different stitches? I copied those used on the jacket at the Museum of London that I examined. Why were they originally done this way? I actually don’t really know.

Centre back seam

Side seam

Side seam detail

Shoulder seam


Day 3
The first thing I did today was try on the jacket for fit. I found that the centre front waist needed to come closer together. Now, a modern seamstress would be cursing up a storm if this happened to them; however, the piecing for fabrics for the sake of economy was so ubiquitous in the 18th century that I had a handy solution available to me sitting in my scrap pile!
So, taking some pieces and matching up the pattern of the print I cut what I needed to add onto the fronts. I sewed these small pieces to the jackets fronts using backstitch.


Of course then I had to piece the lining as well. However, I did that with small running stitches instead of backstitch.


Because I had cut and sewn together the skirt of the jacket before all of the is I also had to piece the fronts of it as well.
Once all that was done I could get back into the normal construction process.
I finished the perimeter edge of the bodice by turning the cotton and lining in towards each other approximately 1/4″ with the cotton extending slightly beyond the lining to keep it hidden from the right side of the garment. I sewed the lining to the cotton with slanted slip stitches using the silk thread.


Finally, I sewed the waistline seam attaching the bodice to the skirt. To do this I folded under the seam allowance of the bodice, lay it on the skirt so that the raw edges of all the pieces matched up, and stitched it with running/stab stitches using the silk thread.


Day 4
I started today with hemming the skirts of the jacket. I turned the hem narrowly under twice and sewed with running stitch using the silk thread. Somehow, this took a whole 2 hours. Then I finished the front skirt edges in the same manner.


I then finished the bottom edge of the jacket lining by turning under the seam allowance and sewing it to the waistline seam with slanted slip stitches using the linen thread.


I found that I needed to re-cut the sleeves – they didn’t fit with the armholes properly – and then I cut out the sleeve cuffs. No pics of these, but you’ll see them soon.
I sewed up the sleeve linings with a lapped seam stitched with slanted slip stitches using the linen thread.

I sewed up the sleeves (no pic yet), and finished the day with finishing the bottom edge of one sleeve. I did this by first fitting the lining inside the sleeve, wrong sides together. I then turned the edges of the sleeve and lining in towards each other and sewed close to the fold with running stitches using the silk thread.

Day 5
Today was all about sleeves and their winged cuffs!
I started today by finishing the bottom edge of the other sleeve. I then seamed the sleeve cuffs with small running stitches using the silk thread.


In an exercise of economy I pieced the cuff linings from linen scraps left over from other garments I’d already completed, or at least started. I then seamed them like I had the cuffs, and used the same small running stitches for all, and the linen thread.

Next sewed the linings into the cuffs by turning the edges of both towards each other and sewing small running stitches near the folded edge with the silk thread.


Next I sewed the cuffs onto the sleeves. The cuffs were sewn to the bottom edges of the sleeves with stitches that were like slip stitches, but went through both layers of the sleeves to look like running stitches from the inside. I went through both sleeve layers intentionally to make the stitches sturdier. I used the silk thread.


To give the cuffs their proper shape, and allow for the curve at the elbow, they have 3 tucks in the, giving them a slightly curved shape over the arm. I marked the positions of the tucks, folded them up and stitched them down through both layers with small running stitches using the silk thread.


After the cuffs were all finished I set the sleeves into the jacket body. This was done differently than other garments of the project, as there were no robings to cover up the shoulders. These sleeves were set-in by pinning the sleeve into the armhole, right sides together all the way round, and stitching one continuous seam of backstitch using the silk thread. There is not a picture at this point, but later on you can see it better.
Here’s how the jacket looks so far:

I finished the day by cutting out the matching stomacher, its lining, and the matching petticoat.
Day 6
Today was all about the petticoat. I started off by sewing up the seams. The petticoat consists of 4 panels of 45″/115cm wide fabric, so there are seams at centre front & back as well as at the sides. I sewed them all selvedge to selvedge with running stitches using the silk thread. I left the seams open at the top of the sides for the pocket slits.
So, no big surprise that finishing the pocket slits came next. I did these by narrowly turning under the fabric twice and stitching it down with running stitches using the silk thread.


I then turned to the petticoat waist. Dress skirts and petticoat waistlines often dipped down into a gentle v at the centre front. This was achieved most often not by cutting the fabric, but by folding it down. Of course, I only decided to do this after I had already sewn up the centre front and didn’t want to rip the stitches out again (which I really should have done), so I cut next to the seam on one side.

With the fabric folded down this way I pleated the top edge of the petticoat into small-ish knife pleats.


I then started binding the waist edge of the petticoat with linen tape. Each of the front and back are bound with separate pieces of tape. To do this I pressed the tape in half legnthwise so that it would stay even across the waist edge. Then I stitched one edge to the right side of the petticoat with running stitches using silk thread.


I finished it off by stitching the other edge of the tape to the inside of the petticoat with slanted slip stitches, also with the silk thread.

Day 7
I started off today by finishing the back of the waistband with the linen tape in the same manner as the front.
So then it was onto finishing the hem. I used a wool braid/tape for this. I started by stitching the wool tape to the outside of the hem with something like a 1/8″ seam with running stitches using the silk thread.

I then pressed the tape down, here’s what it looks like from the back:

I pressed the tape up again, towards the inside of the petticoat and stitched it using running/stab stitches that were longer at the back and small on the outside. With that the petticoat was finished.


I finished off the day by removing the sleeve cuffs and re-positioning them. I’d noticed that the wings in the back would not face the right way when the jacket was worn.
Day 8
Probably not surprisingly, I started off today by re-sewing the sleeve cuffs back onto the sleeves so they will face the right way when wearing the jacket. I wonder how often seamstresses and mantuamakers of the time would make mistakes like this?
Anyhow, after fixing the mistake, I worked on the stomacher. I kept this one simple, no frills or furbelows. I did, however, have to piece the linen lining for the stomacher since I was still being economical with it. I did the piecing with running stitches, using the linen thread.

I then stitched the lining and the printed cotton together by turning the edges in towards each other a scant 1/4″ and stitching running/stab stitches, using the silk thread, through all layers that were longer at the back and very small on the front.


I then made pocket slits in the jacket, since it wouldn’t be very useful to have them in the petticoat and not the jacket skirt. I did not get pictures of this step, however, I worked them in the same manner as the pocket slits for the petticoat so it’s not a total loss.
The final task for this ensemble was making and installing the eyelet strips which enable the jacket to be laced up the front over top of the stomacher.
I took two lengths of linen tape and worked 10 eyelets into each one using the linen thread.


You may observe that I did not use a buttonhole stitch to work these eyelets, the reason being that the little evidence I observed (several sets of stays and a strip of eyelets in a woman’s jacket at the Museum of London) suggests neither did seamstresses of the time! Since these were not going to be seen, I imagine they were not thought worth the time that would be needed to work nice and pretty eyelets, they just needed to do the job.
The final step of all was stitching the eyelet strips into the jacket fronts. I positioned them a little in from the front edges and simply sewed them down with running stitches using the silk thread. This is the manner in which they were sewn into the jacket at the Museum of London.


Et voila! The calico jacket & petticoat ensemble c’est finis!
So, here are the money shots!


18 Comments »
{ RSS feed for comments on this post} · { TrackBack URI }

Natalie Said:
on February 25, 2010 at 19:26
Superb… and the documentation so fine that I could understand each step clearly.
Many thanks!
pomedeterre Said:
on March 11, 2010 at 07:54
this is glorious!
EJVC Said:
on April 6, 2010 at 14:24
Thank you SO MUCH for documenting your work in this detail and for putting it online for us to look at. It is absolutely riveting to read, and the final product is beautiful.
Corinne Steigerwald Said:
on April 15, 2010 at 14:30
Just fabulous! Nice to know there are so many of us out there trying to do lovely handwork. Thank you for posting your costume so we may learn how to ake one similar.
Marie-Noëlle LAFOSSE Said:
on May 7, 2010 at 06:22
I’ve just discovered your blog through a comment you left on Gertie’s blog about buttonhole stich. I shared the same point of view.
The work you made on this dress is amazing. I add your blog on my blogroll at once
Just_Fee Said:
on July 9, 2010 at 09:55
I really enjoy reading through your whole blog and have added it to my own blog as a constant referance. I adore each piece and like how you’ve not only taken the time to sew by hand but also to take pictures. As someone who learns more through pictures I find this clear and easily understandable. So all I can give are heartfelt thanks!
Gail Said:
on July 12, 2010 at 19:24
Our detail is tremendous!
Lytle Markham Said:
on October 11, 2010 at 17:02
Your work is spectacular! Thanks so much for sharing all of this!!
Anna Said:
on November 19, 2010 at 14:22
This is absolutley amazing! must see the rest of your site…
Steffani Lincecum Said:
on January 4, 2011 at 21:39
Wow, these are stunning. I adore all the handwork. You are a true artist. Thanks so much for sharing all your meticulous work.
Andrea Said:
on January 6, 2011 at 10:04
This is so much help for me, your work is wonderful!
Mary Said:
on January 28, 2011 at 09:57
Just lovely! I do not sew, but am an historical reeanctor. I enjoy your blog tremendously, and seeing how you have done each project. I hope you will visit my blog sometime…
http://anhistoricallady.blogspot.com
The Dreamstress Said:
on July 5, 2011 at 05:44
Love the outfit! It’s also scarily close to the jacket ensemble I have just drafted a pattern for – using the same mash up of patterns! Great minds really do think alike and all that 😉
I love that fabric soooooo much! I really must save up and buy some proper reproduction calico. And I’m massively envious that you are using proper linen and silk thread. It’s so hard to get here in NZ 😦
brocadegoddess Said:
on July 5, 2011 at 07:18
Thanks Dreamstress!
I didn’t get many of the materials for this ensemble locally. You don’t find Repro cotton fabric or linen thread in Canada either. I ordered them from the States. The fabric is from an online company called Reproduction Fabrics (inagine that!) and is really well priced. I think this fabric only cost $6-8/yd USD. I can’t remember where I got the thread from now, but there are so many US companies catering to the re-enactment sub-culture there that it shouldn’t be too hard to find. I fluked-out and did manage to get the silk thread in a Toronto store, but I know it’s also readily available online.
Marush Said:
on August 18, 2011 at 12:54
Hi, Carolyn,
Got your name from a colleague (a former textiles curator). Stupendous work & documentation! Through my colleague, I’m overcoming my prejudice against textiles (which comes from having to go through layers of doiliies & hankies…) & learning to appreciate them. I’d love to have a look at your thesis. Is it available?
Thanks very much!
Marta Bertino Said:
on September 12, 2013 at 16:11
Your work is just amazing!! I’m interested in historical costumes, and your blog is really accurate…so I decided to add the link of this blog for the Versatile Blogger Award on my personal blog…. thank you for sharing your works!!greetings from italy
brocadegoddess Said:
on September 14, 2013 at 11:04
Thanks Marta!
18th Century Blue Linen Jacket | Sew historically Said:
on March 24, 2015 at 14:49
[…] these 1769 sewing stitches after Garsault, 18th century stitches on extant garments, and this reproduction […]